

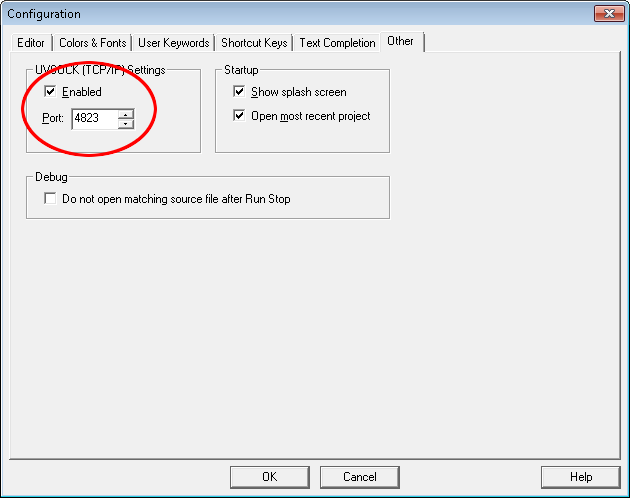
In order to make the Keil uVision IDE interact with the redBlocks Simulator, bring up the IDE’s Configuration dialog via menu Edit -> Configuration and select the tab Other. There, you need to enable the UVSOCK interface and specify the same port you configured within the redBlocks Simulator for the uVision Connection (e. g. 4823). Make sure that there is no other service using this port on your computer and check whether there is only one uVision instance running, otherwise the connection between the uVision IDE and the redBlocks Simulator cannot be established.
After that, you can switch to the redBlocks Simulator and start the simulation (Menu: Simulation -> Start simulation). The redBlocks Simulator now waits for the SiL simulation environment to be started within the Keil uVision Debugger.
Back in the Keil uVision IDE you can compile the project, start the IDE’s host debugger and let the application run (the simulation session in the redBlocks Simulator must be started first).
In case you experience any problems with the connection between the redBlocks Simulator and the uVision IDE, close all instances of the uVision IDE and restart it once.
Upon successful connection, the simulation runs within the redBlocks Simulator and the graphical representation of the target can be operated like the real device.
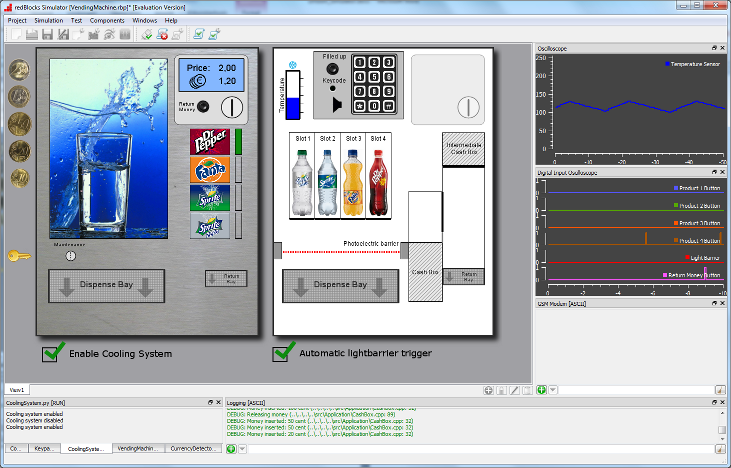
Here are a few example use cases of the VendingMachine example:
- Select a beverage via the product buttons, simulate inserting coins by pressing the coin icons and watch the beverage being released. If the photoelectric barrier is not interrupted after releasing the beverage, the money is returned to the customer. The photoelectric barrier is automatically interrupted by a simulation script, when a product flap opens in order to simulate the bottle falling through, like it would in the real machine. You can change this automatism by toggling the “Automatic lightbarrier trigger” checkbox in order to simulate a product jam within the machine.
While operating the machine, various digital signals can be observed in the oscilloscope on the left side. - Simulate opening the door by hitting the key symbol. In order to deactivate the alarm system of the vending machine, you need to insert an access code via the keypad (which is 1234). If you fail to insert the right code, an alarm SMS is sent via a GSM mode (the AT commands to the modem are displayed in the GSM Modem terminal window).
- The temperature in the cooling chamber of the vending machine is visualized in via a bar control and within the oscilloscope on the right. You can either manually change the measured temperature value by dragging the bar or let the simulation script gradually increase the temperature while the cooling actor is switched off and decrease it while the cooling actor is switched on. The script can be activated / deactivated with the checkbox “Enable Cooling System”.
If the temperature increases beyond a critical value, an alarm SMS is sent via the GSM modem (see GSM Modem terminal window). - The logging output can be observed in the Logging terminal window.
When the application is stopped (e. g. due to a breakpoint) within the debugger, the simulation in the redBlocks Simulator pauses until the application is continued. When resetting the application within the Keil uVision Debugger, the simulation in the redBlocks Simulator is automatically restarted as well.